
Installing CentOS 7 on Virtual Box
In this post I would share the steps for how to setup a Linux environment on a Home system/laptop/desktop.
Download requirements:
1) VirtualBox--It is a virtualisation software. You can download latest version as per your operating system.
2) CentOS 7 Operating system -Download the ISO image
Installing Virtual Box
Installing Virtual Box on Windows is direct and easy.
Start the Installer and Proceed as per below steps.


Once the installation is complete. Please Start Virtual box and verify!

Once the installation is complete. Please Start Virtual box and verify!
Installing CentOS 7 on Virtual Box
1) Open Virtual Box and Click on New
2) Provide the details as per below screens

3) Select the appropriate RAM. I have selected 3 GB Ram for my Virtual Machine.

4) Select to create a harddisk

5) Select Type of hard disk as VDI.

6) Select Storage as dynamically allocated.

7) Provide location to created hard disk and size(I have taken 12 GB size for my VM)

8) Till above steps a new machine would be shown on Virtual Box Manager. Select the machine and click settings

9) Select General> Advanced and make clipboard and Drag n Drop as bidirectional.

10) Select System> Processor. Change the number of process depending on your system. Note: Don't take it beyond green marked threshold.

11) Select Display>Screen and change Video Memory as 128 MB as I am installing GUI.

12) Select Storage > Controller IDE and mount the ISO image of CentOS 7 which was downloaded.


13) Select Network and enable Adapter 1 and Adapter 2.
Adapter 1--> Bridged Adapter (will use for internet)
Adapter 2 --> Host Only Adapter (Will Map Hostname)


14) Once completed close the setting and click on start VM.


15) Select Desired Language

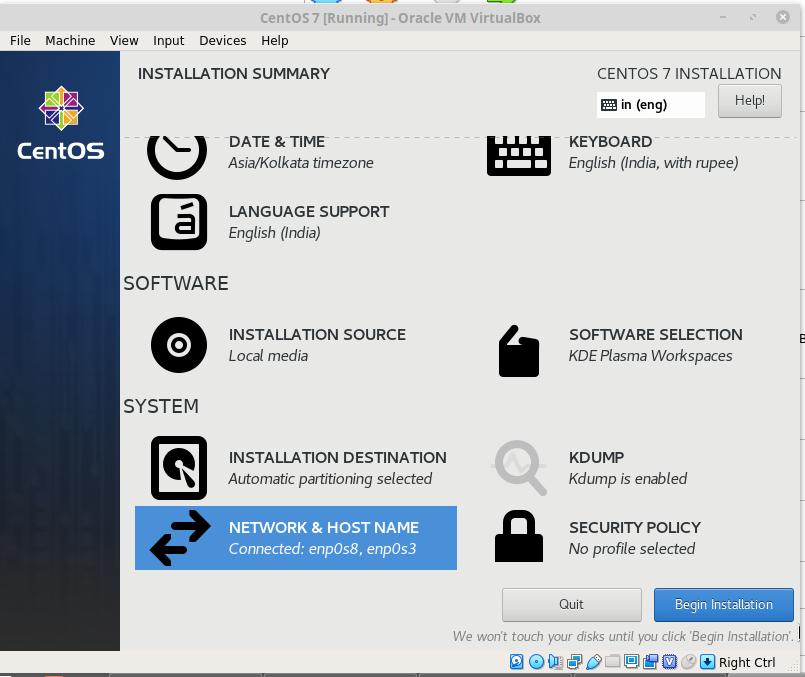
16) The installer will automatically try to detect for date, keyboard and languages. Click on Software Selection and select KDE plasma.


17) Select on Installation Destination and then click Done. As we just verifying the selection the installer made. We are not giving custom file system layout.

18) Click on Network and Hostname and switch on both network. For second ethernet provide desired hostname as in form (hostname.domain). I have given in my case as lfcs.lab

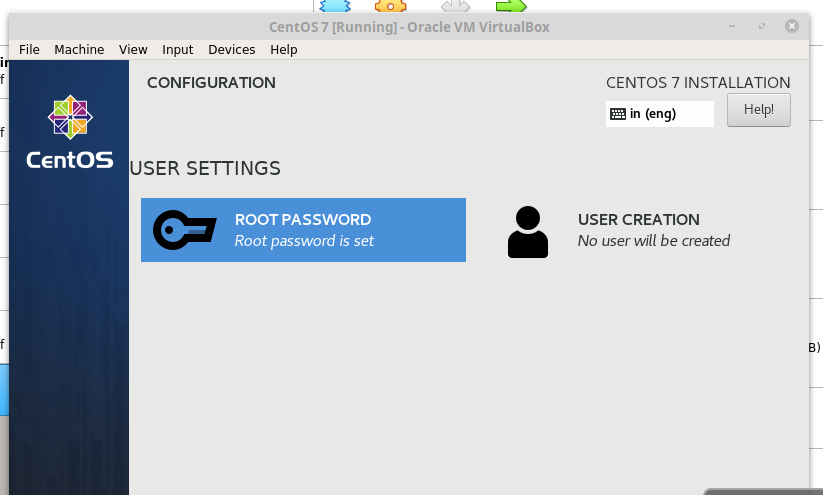
19) Click Next and select change root password. Provide the root password and installer will proceed.

20) Once the installer completes, Please click on reboot.

21) After Reboot Select the License Information and accept. Then click on finish configuration.


22) Once it finishes System will reboot and ask you to login first time. We will login with root user.

23) Installation is finished. Now we will install Kernel headers and then install Guest Additions
Open Terminal from root and run Below
yum install kernel-devel
yum install kernel-headers
yum install gcc
Once completed install Guest Additions


Once completed Restart the system and Enjoy..
Post a Comment
Post a Comment